
Kitchen Interior Design Guide
Kitchen Interior Design Ideas
The best kitchen interior design ideas begin with how you actually cook, store, clean, serve and move—not with a cabinet colour or an oversized island. Start by choosing a layout that protects the working aisle, place refrigeration, pantry, preparation, cooking and clean-up in logical activity zones, give everyday items a defined storage position, and confirm appliance sizes before cabinetry is detailed. Use the island only if it improves preparation, serving or seating without blocking appliance doors or circulation; use tall units for pantry and integrated appliances where they reduce visual clutter; and layer task, ambient and decorative lighting so the worktop is properly lit at night. For open-plan homes, coordinate kitchen finishes with the living and dining areas without making every surface identical. For compact kitchens, prioritise uninterrupted worktop, drawers, vertical storage and clear movement over decorative features. This guide shows you how to make those decisions room by room, where to spend more, what commonly goes wrong, and how to turn kitchen inspiration into a practical design for your own home.
Use this guide whether you are planning a new villa kitchen, renovating an apartment kitchen, improving a small galley, adding an island or trying to make an open-plan kitchen feel calmer from the living room. The ideas are organised around decisions you can test against your actual floor plan, appliance list, household routines and budget.
Start With These Decisions
A kitchen works best when the plan solves movement, storage and services before the finishes are chosen.
If you only change five things, make them these: the layout, the work zones, the storage hierarchy, the lighting plan and the relationship between the kitchen and the rest of your home.
Choose the layout from the room
L-shape, galley, U-shape, one-wall and island layouts solve different widths, door positions and circulation patterns. Do not force an island into a room that performs better without one.
Plan activity zones
Keep food storage, preparation, cooking, clean-up, coffee and serving items close to the tasks they support. This is more useful than filling every available wall with cabinetry.
Confirm appliances early
Refrigerator, oven, dishwasher, hob, hood, coffee machine and small-appliance requirements affect cabinet widths, ventilation, power, plumbing and door clearances.
Light the worktop, not just the ceiling
General lighting makes the room bright; task lighting makes the kitchen usable. Add decorative lighting only after the preparation, cooking and cleaning surfaces are properly illuminated.
Control what the living room sees
In an open-plan home, decide which kitchen elements should disappear into the architecture and which should become focal points. This keeps the kitchen connected without visually taking over the whole room.
Spend on what you touch every day
Good runners, hinges, worktops, task lighting, useful drawers and well-planned storage usually add more daily value than decorative upgrades that do not improve how the kitchen works.
Idea 01
Start With Your Kitchen Routine, Not With a Style
Before you save another kitchen picture, write down what happens in your kitchen on a normal weekday and on a busy weekend. Who cooks? Does one person prepare while another clears? Do children eat at the island? Do you buy groceries in bulk? Is coffee made several times a day? Do you host formally, or does food move straight from the kitchen to an open dining table?
Those answers change the plan. A household that cooks heavily may need generous preparation space, strong extraction and easy access to spices, oils and cookware. A family that relies on quick breakfasts may gain more from a dedicated coffee-and-breakfast zone than from a display shelf. A home that entertains frequently may need a serving route that lets food reach the dining area without crossing the main cooking zone.
Use visual references after these routines are clear. A photograph can help you identify a finish, lighting mood or cabinet proportion, but it cannot tell you whether that exact layout will work with your doors, windows, ceiling, appliance sizes and household traffic.
Idea 02
Choose the Kitchen Layout From the Room You Have
The most attractive layout is the one that leaves enough room to work, opens appliance doors safely and keeps household traffic from cutting through the main preparation zone. The shape of the room, window positions, service locations and connection to dining or living should decide the basic layout before the island, finishes or decorative details are discussed.
An L-shaped kitchen keeps the centre open and often connects naturally to dining. A galley is efficient when the room is narrow and the central aisle is protected from through-traffic. A U-shaped kitchen can offer excellent worktop and storage but may feel enclosed if too many tall units are added. A one-wall kitchen is visually simple but needs disciplined storage because all functions compete for one run. An island layout only earns its footprint when the surrounding circulation remains comfortable.
| Layout | Works well when | Watch carefully | Good design move |
|---|---|---|---|
| L-shaped | The kitchen opens to dining or living and you want a clear centre | Dead corner storage and overly long cabinet runs | Use one leg for tall storage and keep the other more open for worktop |
| Galley | The room is narrow and efficiency matters | The aisle becoming a household corridor | Group tall units toward one end and keep the main prep zone uninterrupted |
| U-shaped | You need generous worktop and storage on three sides | The centre feeling tight or visually enclosed | Limit tall cabinets and protect the strongest daylight or view |
| One-wall | The kitchen must stay visually quiet in a compact open plan | Not enough worktop between appliances | Use full-height storage strategically and integrate small appliances |
| Island | The room has enough width and the island has a clear job | Blocked doors, shallow aisles and seating conflicts | Choose one primary function—prep, serving, seating or sink—before adding more |
| Peninsula | You want extra worktop or seating but cannot support a full island | The return creating a narrow entry | Use it to define the kitchen edge without over-closing the room |
Idea 03
Plan Activity Zones Instead of Treating Every Cabinet as Equal
The traditional sink–refrigerator–cooking triangle remains a useful sense-check, but modern kitchens usually contain more than three important activities. Current NKBA planning guidance has moved toward identifying centres or activity zones, which is closer to how real kitchens are used today: food storage, preparation, cooking, clean-up, coffee, baking, serving and waste can each need their own relationship to tools and storage.
Put ingredients and preparation tools near the worktop where food is actually prepared. Keep everyday plates and glasses close to the dishwasher so unloading does not require walking across the kitchen. Store pans, utensils and oils close to the cooking zone, while bulk groceries and rarely used appliances can sit farther away in tall pantry storage.
This approach prevents a common problem: a kitchen with a large number of cabinets but poor storage. Capacity is not the same as usability. Deep shelves, inaccessible corners and random drawer contents create more daily friction than a smaller amount of well-zoned storage.
- Food entry: refrigerator, freezer and pantry close to the route groceries arrive from
- Preparation: clear worktop, knives, chopping boards, bowls and waste within easy reach
- Cooking: hob, pans, utensils, oils and heat-safe landing space grouped logically
- Clean-up: sink, dishwasher, bins and everyday dish storage coordinated together
- Breakfast / coffee: machine, cups, water, coffee, tea and breakfast items in one compact zone
- Serving: plates, cutlery and serving pieces positioned for the dining route rather than hidden across the kitchen
Idea 04
Design the Kitchen Island Around One Clear Job
An island can be the most useful element in the kitchen or the reason the entire room feels cramped. Decide first what you need it to do. A preparation island benefits from uninterrupted surface and storage below. A social island needs comfortable seating and a route behind the stools. A sink island requires plumbing, power and a plan for dishes. A cooking island affects extraction, power or gas, safety, ceiling coordination and the visual relationship with guests.
Do not size the island from a Pinterest image. Measure it against the actual room, open appliance doors, tall-cabinet pull-outs and the number of people who cook together. NKBA's publicly available planning guideline recommends a work aisle of at least 42 inches / 1067 mm for one cook and 48 inches / 1219 mm for multiple cooks. Treat these as professional planning references, then verify the final arrangement against your appliances, users, accessibility needs and applicable local requirements.
If the room cannot support an island without tightening the work zone, a peninsula, movable prep table or simply more open floor can be a better design decision. A kitchen does not become less premium because it has no island.
Island for preparation
Keep the top as continuous as possible, place drawers for knives and utensils on the working side, and use the opposite side for shallow storage or occasional seating.
Island for breakfast seating
Protect the route behind stools, avoid placing the main cooking position directly against seated children, and provide power only where it supports real use.
Island with sink
Plan dishwasher, waste, plumbing, sockets and dish storage as one clean-up centre so the sink does not become an isolated feature in the middle of the room.
Idea 05
Build Storage Around Frequency of Use
The best kitchen storage idea is not 'more cabinets'. It is placing the right item at the right height and distance from the task. Keep everyday cookware, utensils and food where you can reach them without stepping away from the work zone. Use the highest cupboards and deepest pantry areas for items you use occasionally rather than sacrificing prime storage to rarely used equipment.
Wide drawers are often more useful than deep base-cabinet shelves because the contents come toward you instead of disappearing at the back. Internal dividers help when they match real categories—cutlery, cooking tools, plates, spices or food containers—but excessive organisers can reduce flexibility. Design the inside of the cabinetry only after you know what it needs to hold.
For large villas or households that buy in bulk, a walk-in or tall pantry can take visual pressure off the main kitchen. For apartments, a well-planned tall bank can combine pantry, refrigerator, oven and appliance storage into one architectural wall, leaving the remaining kitchen calmer.
- Daily-use items between comfortable hand and eye level
- Heavy pots and small appliances in strong lower drawers or accessible shelves
- Tall pantry pull-outs only where the width, hardware and contents justify them
- Tray, chopping-board and baking-sheet dividers placed close to preparation or oven zones
- Cleaning products separated from food where practical
- A defined home for waste, recycling and spare bags near the clean-up or prep zone
Idea 06
Use Tall Units to Simplify the Kitchen, Not to Turn Every Wall Into Storage
A floor-to-ceiling bank can make a kitchen look composed because refrigerators, ovens, pantry storage and small appliances read as one controlled elevation. It works especially well in open-plan kitchens where you want fewer visual interruptions from the living area.
But tall cabinets also remove worktop and can make a narrow kitchen feel enclosed. Concentrate them where they solve real storage or appliance needs, then give other walls visual relief. If you have a strong window, view or backsplash, allow it to breathe rather than surrounding it with tall cabinetry.
Integrated appliances create a cleaner appearance but require precise ventilation, service access and door coordination. Confirm the exact appliance models before final shop drawings. Designing a generic niche and choosing the appliance later is one of the easiest ways to create costly joinery revisions.
Idea 07
Protect One Uninterrupted Preparation Surface
A kitchen can have a large total amount of worktop and still feel short of usable preparation space if that surface is broken into small pieces between the refrigerator, sink, hob, coffee machine and tall units. Identify one main preparation zone and keep it as clear as possible.
Position it where ingredients, sink and cooking are logically connected. Keep permanent countertop appliances together rather than scattering them across every surface. If you use a stand mixer, air fryer, toaster, coffee machine or water system daily, plan where each one will live before approving the elevations.
An appliance garage can hide small appliances in an open-plan kitchen, but it only works when doors can stay open safely during use, heat and ventilation are appropriate, and the appliances do not become inconvenient to access. Concealment should not create an extra daily task.
Idea 08
Treat the Sink, Dishwasher and Waste as One Clean-Up Zone
The sink is not just a visual decision. It is part of a sequence: scrape, rinse, load, unload and put away. Place the dishwasher close enough to the sink that dripping dishes do not cross the floor, then position everyday crockery so unloading is short and direct.
Waste and recycling should be close to both preparation and clean-up. If the bin is hidden at the far end of the island, every food-prep task creates unnecessary movement. A pull-out below or beside the main preparation area often works better, provided it does not conflict with the sink, dishwasher or plumbing.
If the kitchen is used by several people, avoid placing the dishwasher where its open door blocks the only route through the room. This small coordination point can matter more in daily life than the choice between two visually similar finishes.
Idea 09
Plan the Cooking Zone With Extraction, Landing Space and Cleaning in Mind
Choose the hob or cooker together with the extraction strategy, not after the ceiling and cabinetry are finished. Hood width, duct route, ceiling depth, make-up air, power and manufacturer instructions can affect the entire wall or island composition.
Keep useful landing space beside the cooking surface for hot pans, ingredients and serving. NKBA's publicly available guideline recommends at least 12 inches / 305 mm of landing on one side of a cooking surface and 15 inches / 381 mm on the other. These are planning references; the appliance manufacturer's safety clearances and the requirements applicable to your project take priority.
Materials around the cooking zone should tolerate the way you cook and clean. A delicate finish may be acceptable in a lightly used show kitchen but frustrating in a heavily used family kitchen. Match the material performance to your cooking habits rather than to the photograph alone.
Idea 10
Choose Worktops and Backsplashes for Maintenance as Well as Appearance
A dramatic slab can define a kitchen, but the correct surface depends on staining risk, heat, impact, edge detail, fabrication, cleaning and the amount of maintenance you are willing to accept. Natural stone, engineered surfaces, porcelain and compact materials all have different strengths; no material is automatically 'best' for every household.
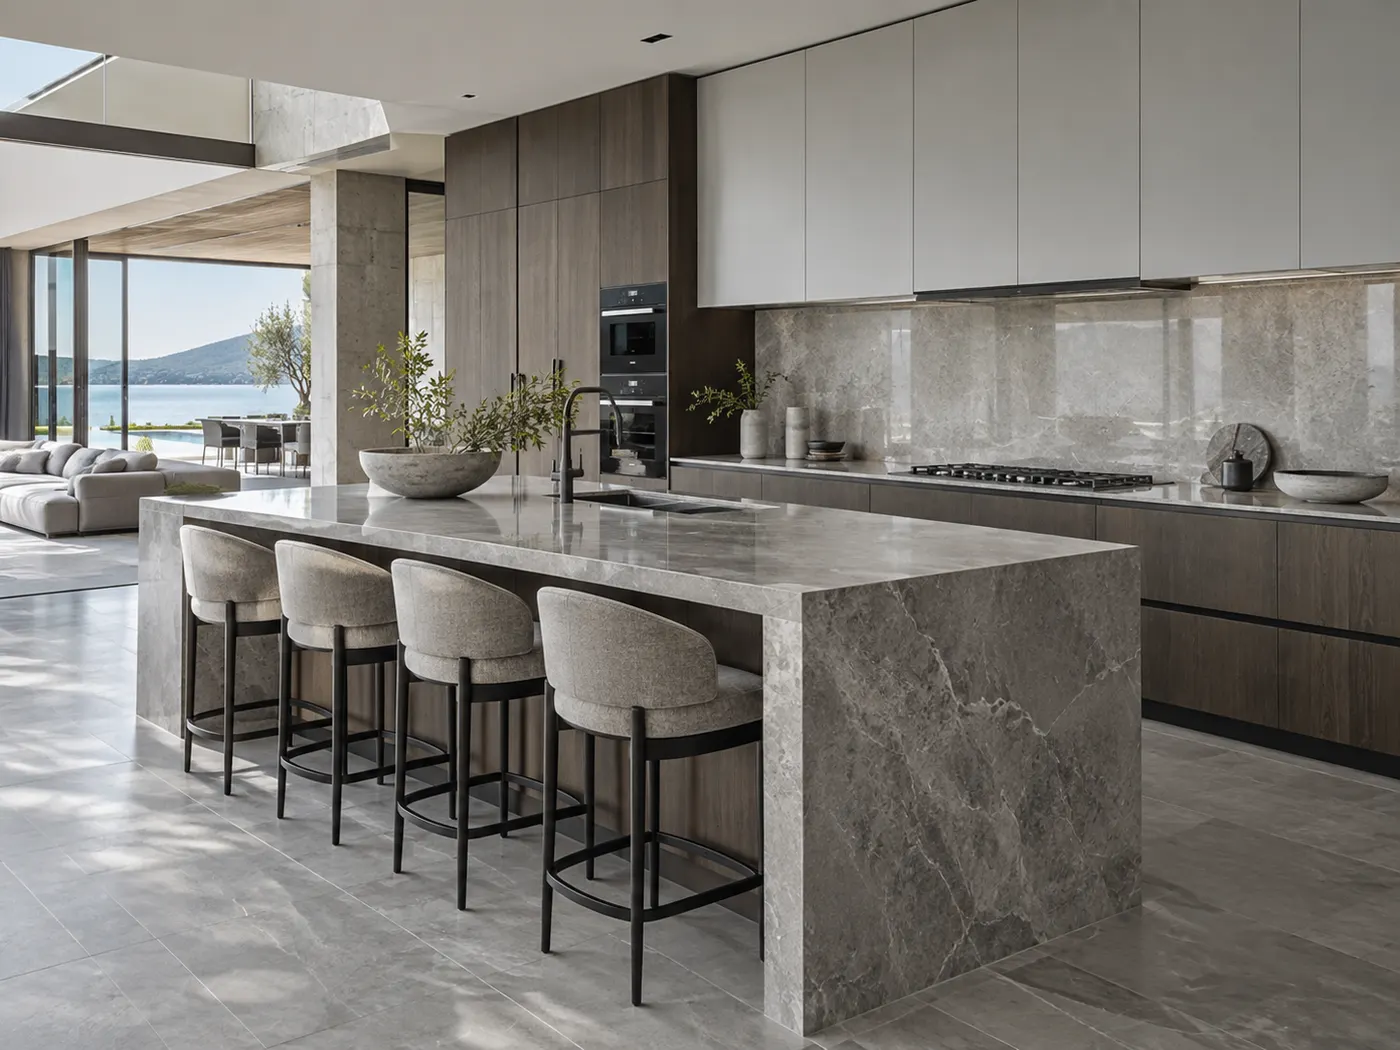
Use the strongest material statement where you will actually see it. In an open-plan kitchen, the island front or backsplash may deserve more visual character while perimeter worktops remain quieter. If the stone is highly veined, plan seams, waterfall edges, socket cut-outs and slab matching before fabrication so the pattern does not break awkwardly.
The backsplash should also be resolved around cleaning. Fewer joints generally simplify maintenance, while small-format tile creates more grout. If you prefer tile, use it deliberately as texture rather than defaulting to it because the worktop decision was made late.
| Surface decision | Prioritise | Ask before choosing |
|---|---|---|
| Worktop | Heat, staining, impact, edge detail, repair and maintenance | What happens if oil, lemon, hot cookware or a dropped pan reaches this surface? |
| Backsplash | Cleaning, joints, socket detailing and visual balance | Will the pattern still work after outlets, corners and hood details are introduced? |
| Cabinet fronts | Touch, cleaning, colour stability and repairability | How will fingerprints, chips or repeated cleaning show on this finish? |
| Floor | Grip, durability, cleaning and transition to adjacent rooms | Does the flooring continue into living areas, and should the kitchen read as one space or a separate zone? |
Idea 11
Use a Controlled Material Palette Instead of Making Every Cabinet a Feature
A kitchen becomes easier to read when one material leads and the others support it. You might use warm timber for tall units, a quiet painted finish for base cabinets and a stronger stone on the island. Or you might keep all cabinetry consistent and let lighting, stools and backsplash create the contrast.
Two-tone kitchens work best when the split follows the architecture: tall units in one finish and lower working cabinets in another is usually clearer than changing colour randomly from door to door. Dark finishes can make a large kitchen feel grounded, while light finishes can reduce visual weight in a compact room, but both still depend on daylight, ceiling height and the surrounding materials.
If your living and dining spaces are visible from the kitchen, repeat one or two elements rather than copying the entire palette. A timber tone, metal finish or stone family can connect the spaces while allowing the kitchen to remain functionally distinct.
Handles, integrated pulls and edge profiles should follow the same hierarchy. A visible metal handle can add useful rhythm to simple cabinetry, while a recessed or handleless detail can keep an open-plan elevation quieter. Choose the system for grip, cleaning and door size as well as appearance—especially on heavy refrigerator panels, tall pantry doors and frequently used drawers.
Idea 12
Layer Kitchen Lighting for Work, Atmosphere and Night-Time Use
Ceiling downlights alone often produce a bright room but a poorly lit worktop because the person standing at the counter creates their own shadow. Add task light where preparation actually happens—commonly under wall cabinets, within selected shelving or through carefully positioned ceiling fittings.
Use pendant lights over an island when they add useful light or establish scale, not because every island is expected to have three pendants. A long linear fitting, small pendants, recessed lights or no decorative fixture at all can be correct depending on ceiling height, sightlines and what happens on the island.
Separate working and evening scenes. In an open-plan home, you may want the kitchen functional and bright while cooking, then visually quieter after dinner. Independent switching for task lighting, decorative fixtures and selected joinery lighting helps the room change character without leaving the whole ceiling on.
Idea 13
Make an Open-Plan Kitchen Belong to the Living and Dining Space
If your kitchen is part of a complete villa or apartment project, it should not be designed as an isolated cabinet package. Clients comparing interior design in Abu Dhabi often need the kitchen, dining area and living room to share sightlines, material rhythm and lighting logic while still performing as different zones. That whole-home relationship is where an interior plan becomes more valuable than a collection of separate room decisions.
From the sofa, decide what you want to see: perhaps a clean island, one stone feature and a calm wall of tall cabinetry. Hide visual clutter such as small appliances, exposed food storage and random charging cables where possible. At the same time, do not make the kitchen so minimal that daily items become inconvenient to reach.
Think about sound and smell as well as appearance. Extraction, appliance noise, hard surfaces and the absence of doors affect the living space. Soft furnishings in adjacent zones, good extraction and a sensible appliance specification can make an open kitchen feel more comfortable without adding visual barriers.

Idea 14
Small Kitchen Interior Design Ideas: Protect Worktop and Movement First
A small kitchen becomes more useful when every cabinet has a role and the room is not forced to imitate a large luxury kitchen. Start with one clear worktop, a logical sink–prep–cooking sequence and enough aisle width to open the main appliances. Only then add tall storage, wall cabinets or decorative features.
Use drawers to make lower storage accessible, take selected cabinetry to the ceiling when the extra volume is genuinely useful, and keep the floor visually continuous where possible. A compact kitchen often feels larger when the cabinet palette is controlled and the worktop is not crowded with appliances.
Avoid miniature islands that create circulation problems. A peninsula, fold-down table, slim console-height prep surface or simply an open centre can provide more value. The goal is not to fit every kitchen feature into a smaller room; it is to preserve the functions you use most.
- Prefer one strong preparation surface over several narrow fragments
- Use vertical storage for occasional items, not for things you need several times a day
- Choose compact or integrated appliances only when their capacity still suits the household
- Keep handles, colours and visible joints visually disciplined
- Use reflective or light finishes selectively; do not rely on white alone to make a poor layout feel spacious
Idea 15
Design Family and Entertaining Kitchens for More Than One User
When several people use the kitchen, the plan should allow someone to make coffee, load the dishwasher or take a snack without entering the cook's main work area. This is where secondary zones become useful: a breakfast cupboard, beverage fridge, serving storage or pantry can reduce traffic through the preparation and cooking centres.
If children use island seating, consider where bags, school items, charging and homework actually happen. Seating that looks elegant but has no nearby power, no overhang or conflicts with a hot cooking surface will not work as intended.
For entertaining, think about the route from refrigerator and oven to serving surface and dining table. A generous island can become a buffet or gathering point, but it should not trap the cook behind guests. Good social kitchens let people be present without everyone standing in the same working aisle.
Idea 16
For a Kitchen Renovation, Decide What Is Worth Moving Before You Redesign the Cabinets
In an existing kitchen, moving the sink, hob, extraction, electrical loads or major appliances can improve the layout, but it may also affect plumbing, drainage, ductwork, ceilings, waterproofing, floor finishes and approval requirements. Compare the functional gain with the construction impact before assuming every service should move.
If the existing service positions are already logical, retaining them can release budget for better cabinetry, worktops, lighting or appliances. If the current layout fundamentally blocks workflow, preserving it simply to save demolition can lock the same problem into a new-looking kitchen.
Sequence matters: confirm layout, services and appliance data; resolve cabinetry; coordinate lighting and power; approve finishes; then move into shop drawings and fabrication. Ordering stone before cabinetry is installed and checked, or choosing appliances after cabinet fabrication, creates avoidable risk.
Idea 17
Spend More Where the Kitchen Is Permanent, Mechanical or Touched Every Day
A kitchen budget should protect the items that are difficult to change later: layout, services, cabinetry structure, quality hardware, worktops, lighting points and appliance integration. Decorative stools, pendant lights and accessories are easier to replace when taste or budget changes.
Custom internal fittings can be excellent when they solve a real storage problem, but do not specify expensive pull-outs simply because they exist. A simple wide drawer may provide better access and flexibility. Likewise, a premium stone is worthwhile when you value its character and accept its maintenance; it is not automatically a smarter investment than a more practical surface.
If the budget is under pressure, simplify the material palette before compromising the plan. Fewer cabinet finishes, standardised door sizes, a restrained backsplash and selective feature stone can still produce a refined kitchen when the proportions and details are well resolved.
| Priority | Usually worth protecting | Can often be simplified first |
|---|---|---|
| Layout and services | Clear workflow, safe appliance operation, plumbing and power coordination | Unnecessary service relocation that adds cost without improving use |
| Cabinetry | Strong carcasses, reliable hinges/runners, useful drawer sizes | Excessive decorative panels and internal gadgets |
| Worktops | Performance appropriate to cooking and maintenance | Using premium feature material on every surface |
| Lighting | Task lighting and correct switching | Decorative fixtures that do not improve the work surface |
| Appliances | Capacity, reliability, ventilation and actual household needs | Buying features you will rarely use |
| Styling | A few elements that connect the kitchen to the home | Multiple statement finishes competing at once |
Idea 18
Kitchen Interior Design Ideas That Commonly Fail in Real Homes
Forcing in an island
An island that narrows work aisles, blocks appliance doors or pushes seating into circulation makes the room less useful even if it looks impressive in photographs.
Designing cabinetry before choosing appliances
Integrated appliances, ventilation requirements, door swings and service access vary by model. Late appliance changes can force cabinet and worktop revisions.
Adding storage without assigning contents
More cabinets do not solve poor organisation. Deep shelves, blind corners and tall pull-outs can become inconvenient if their contents and frequency of use were never considered.
Using decorative lighting as task lighting
Pendants may create atmosphere but can leave the actual preparation surface in shadow. Functional worktop lighting needs its own plan.
Putting the dishwasher in the traffic route
An open dishwasher door can block a narrow galley, island passage or the main route to dining. Test doors open, not just closed.
Choosing the worktop only by appearance
A surface that does not match your heat, staining and maintenance expectations can become a daily frustration regardless of how premium it looked in the showroom.
Making every finish a feature
Strong stone, timber, coloured cabinetry, metal, patterned tile and statement lighting can compete. Choose a hierarchy so the eye knows what matters.
Ignoring the view from the living room
Open-plan kitchens need a visual strategy for appliances, small items, tall storage and lighting after cooking is finished. Design the room from the adjacent sofa and dining table as well as from inside the kitchen.
Project-Based Insight
A Kitchen Idea Becomes Useful Only When It Solves the Whole Room
On an open residential floor, the kitchen is part of a larger composition. The same decisions that organise living and dining—clear sightlines, defined circulation, material restraint and lighting hierarchy—also determine whether the kitchen feels integrated or simply attached to the room.
Bella's residential project preview below illustrates that principle at whole-room scale: zones are defined without visual barriers, and the material and lighting language supports movement between them. In a kitchen project, we apply the same thinking to the island, tall units, dining connection and the route people take through the space.
Open Living, Connected Spaces
A generous living and dining zone needed to feel connected enough for family life and entertaining, while still giving each activity a clear place and keeping movement through the room effortless.
We used furniture zoning, a restrained material palette and strong architectural sightlines to define living, dining and circulation without adding visual barriers. Lighting and joinery were treated as part of the layout so the room feels composed from every approach.
Before You Finalise
Use This 8-Step Check to Shortlist Kitchen Interior Design Ideas
Measure the real room
Record walls, windows, doors, ceiling conditions, service points and the routes people use to enter and pass through the kitchen.
List appliances
Confirm what you are keeping and what you plan to buy, including small appliances that need permanent counter or cabinet space.
Map activity zones
Place food storage, preparation, cooking, clean-up, coffee, serving and waste based on actual routines.
Choose the layout
Select the cabinet geometry that protects movement and worktop before deciding whether an island is appropriate.
Assign storage
Name what goes into the main drawers, pantry, tall units and difficult corners before approving internal fittings.
Coordinate services
Check plumbing, drainage, extraction, power, lighting, appliance ventilation and island requirements before fabrication.
Build a material hierarchy
Choose one leading cabinet or stone idea and support it with quieter finishes that also meet maintenance expectations.
View it from outside the kitchen
For open plans, assess the design from the living room, dining table and main approach so the kitchen belongs to the home when it is both busy and quiet.
Final Takeaway
The Strongest Kitchen Interior Design Ideas Make Cooking Easier and the Whole Home Calmer
A successful kitchen is not defined by whether it has an island, handleless doors, marble, hidden appliances or the latest colour. It is defined by whether the layout supports your routines, the storage is easy to use, the worktop is available when you need it, the appliances operate without conflict, the lighting supports real tasks and the materials still make sense after months of cooking and cleaning.
Choose inspiration that solves a problem in your own room. If an idea does not improve workflow, storage, maintenance, light, comfort or the relationship with the rest of your home, it is decoration rather than a design decision.
When you are ready to move from ideas to a real plan, bring your floor plan or measurements, current photographs, appliance preferences and the problems you want the kitchen to solve. Those four inputs are enough to begin testing a layout before you commit to cabinetry or finishes.
Continue Planning
Related interior design guides
These published guides help you connect the kitchen to whole-home planning, materials and practical design decisions.
Home Interior Design Ideas
Home interior design ideas for living rooms, bedrooms, kitchens, small homes and UAE villas, with practical layout, lighting, storage and budget advice.
→ Planning & ProcessInterior Design Tips
Home interior design tips for layout, lighting, materials, furniture, storage, kitchens, bathrooms, budgets and better project decisions in the UAE.
→ Materials & DetailsInterior Design Materials
Compare interior design materials including stone, timber, metal, glass, porcelain, fabrics and countertops by use, maintenance and UAE conditions.
→Kitchen Ideas FAQs
Kitchen Interior Design Ideas — Frequently Asked Questions
What are the best kitchen interior design ideas to start with?
Start with layout, work zones, storage, appliance positions and lighting. Once those decisions work, choose cabinetry, worktops, backsplash, handles and decorative lighting. Starting with finishes can produce a good-looking kitchen that still has poor circulation or insufficient preparation space.
What is the best layout for a kitchen?
There is no single best layout. An L-shape often suits open plans, a galley can be efficient in narrow rooms, a U-shape gives generous worktop and storage, and an island can add preparation or social space when the room has enough clearance. Choose the layout from room geometry, appliance doors, circulation and the number of people who use the kitchen.
How much space should I leave around a kitchen island?
NKBA's publicly available planning guideline recommends a work aisle of at least 42 inches / 1067 mm for one cook and 48 inches / 1219 mm for multiple cooks. Use these as design references rather than a universal UAE code: actual appliance doors, seating, accessibility, room shape, manufacturer instructions and applicable local requirements can justify more space.
Is a kitchen island always a good idea?
No. An island is useful only when it improves preparation, storage, serving or seating without compromising circulation. In a smaller room, a peninsula, movable table or open centre can be more comfortable and visually generous.
How can I make a small kitchen look and work better?
Protect one clear preparation surface, use drawers for accessible lower storage, take selected cabinets higher where the extra volume is useful, keep the material palette controlled, and avoid forcing in an island. Good task lighting and fewer objects left on the worktop also make a compact kitchen feel calmer.
Are floor-to-ceiling kitchen cabinets a good idea?
They are useful for pantry storage and integrated appliances and can create a clean elevation, especially in an open plan. Do not fill every wall with tall cabinetry: it removes worktop and can make a narrow or darker kitchen feel enclosed.
Should I choose appliances before the kitchen cabinets are designed?
Yes, or at least confirm the exact appliance specifications before final shop drawings. Integrated appliances need model-specific dimensions, ventilation and service access, and even freestanding appliances affect door clearances, worktop and adjacent cabinetry.
What is the best kitchen worktop material?
The best surface depends on heat, staining, impact, maintenance, edge detail, fabrication and appearance. Natural stone, engineered surfaces, porcelain and compact materials all behave differently. Choose from technical performance and your maintenance tolerance rather than price or appearance alone.
How should I light a kitchen?
Use layers: ambient light for the room, direct task light for preparation and cooking surfaces, selected joinery or pantry light where useful, and decorative lighting for atmosphere. Pendant lights should complement rather than replace task lighting.
How do I make an open-plan kitchen look connected to the living room?
Repeat a controlled material or colour cue—such as timber tone, metal finish or stone family—without making the two spaces identical. Keep the kitchen's visible elevations calm, conceal everyday clutter where practical, and coordinate island position, dining furniture and lighting along the same sightlines.
Where should I spend more in a kitchen renovation?
Protect the layout, service coordination, cabinet construction, hinges and runners, useful drawers, worktop performance, task lighting and appliance integration. Decorative items are easier to replace later, so they are usually better places to simplify if the budget becomes tight.
What information should I prepare before speaking to a kitchen interior designer?
Share the floor plan or measurements, current photographs, property type and location, the appliance list you expect to use, the main problems with the current kitchen, how many people cook, whether the kitchen is open or closed, and your target timing and budget range if known.
References
Sources & further reading
Professional definitions and specialist references used to support or verify specific points in this guide.
Discuss Your Kitchen
Tell us what your kitchen needs to do better.
Send your floor plan or approximate measurements, current photographs, appliance preferences and the main problems you want to solve. Bella can then identify whether the right next step is layout planning, full kitchen design, a wider residential interior scope or design-and-fit-out coordination.